A call out for all the creative and hard-working tutors out there!
PiggyRide is inviting you all to join their creative learning & teaching community, by providing an opportunity to create your teaching content on our platform. From the very start, PiggyRide has been providing an interactive platform for both the tutor and the kids.
Why Should You Choose PiggyRide?
PiggyRide is your one-stop destination for online kid’s classes that are super fun and easy to learn. They offer live online classes based on their age, skill level, and interests. Our platform will enable you to connect with well-qualified and experienced teachers and tutors in a variety of subjects. Delve into an immersive learning experience by encouraging your children to learn through video tutorials. Moreover, PiggyRide is ranked as a top and the leading destination for offering quality online education to children. Apart from students, it is an excellent avenue for all the teachers and tutors who are interested in teaching kids and interested in passing on their knowledge and wisdom to the future of the country. With more than 3,000 tutors on board, PiggyRide has managed to build a stable relationship between the students and children. Intending to bring all the endless possibilities for your little champ, we also offer workshops for enhancing creativity and critical thinking skills in your kids. The best thing about our workshops is that they are free and full of fun! So what are you waiting for?
Join our creative journey and let’s create a collaborative and immersive learning experience together.

What Makes PiggyRide the Best?
Now, you must be wondering what is our USP? What is the one thing that makes us the best and a trusted online learning platform in the country?
Well, there is not 1 but 3 USP features that set us apart from our competitors and also make us the best.
i) Free Workshops
To enhance the creative side of your child, you can participate in our workshops that are free of cost. At PiggyRide, we offer free and creative workshops that will help your children ace the necessary skills with passion and confidence.
ii) Hassle-Free Booking
At PiggyRide, we value your time and efforts. Therefore, the best part about our online workshops and courses is the booking part. You just have to visit our website and open up the workshop or the course section. Browse through our different categories and choose the best one according to your needs. After carefully choosing, you just have to click on Book Now! And you are sorted.
iii) Experienced and Verified Instructors
With more than 3,000 tutors we have always focused on providing the best for both the children as well as the tutors. All the tutors are well-qualified and highly experienced.
Are you ready to start your creative journey with us? Are you all set to pass on your learning wisdom to the bright minds of our country?
We have curated an effective and helpful guide that will enable you to create your content on our website.
Steps to Follow While Creating Course or Workshops on PiggyRide
Step 1- As a first step, you are supposed to register your tutor profile on our website and once the admin approves your tutor profile, you can proceed to the next step.
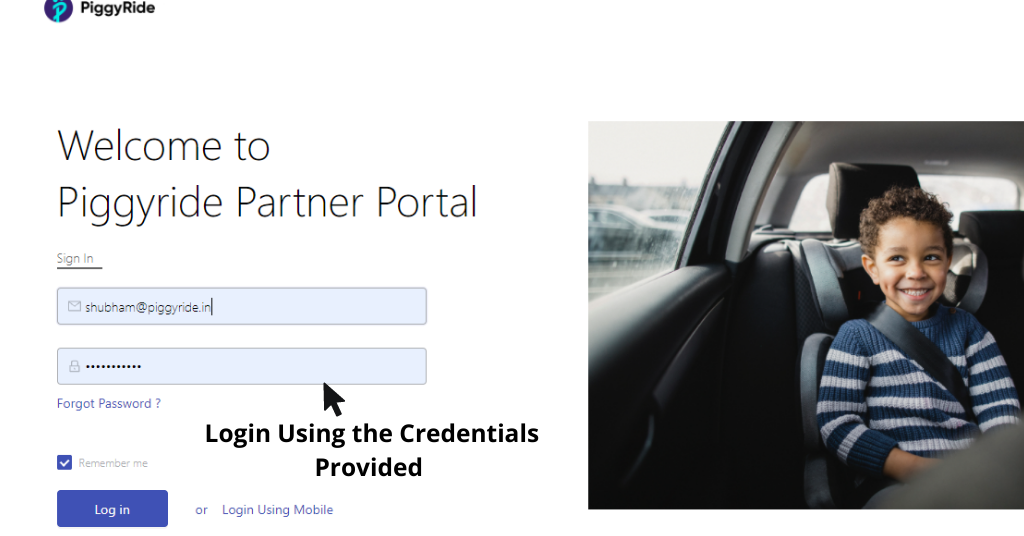
Step 2- Open the PiggyRide Partner Portal website using the following link: https://partner.piggyride.com/login
Step 3- Now, login into the partner portal using the credentials provided to you.
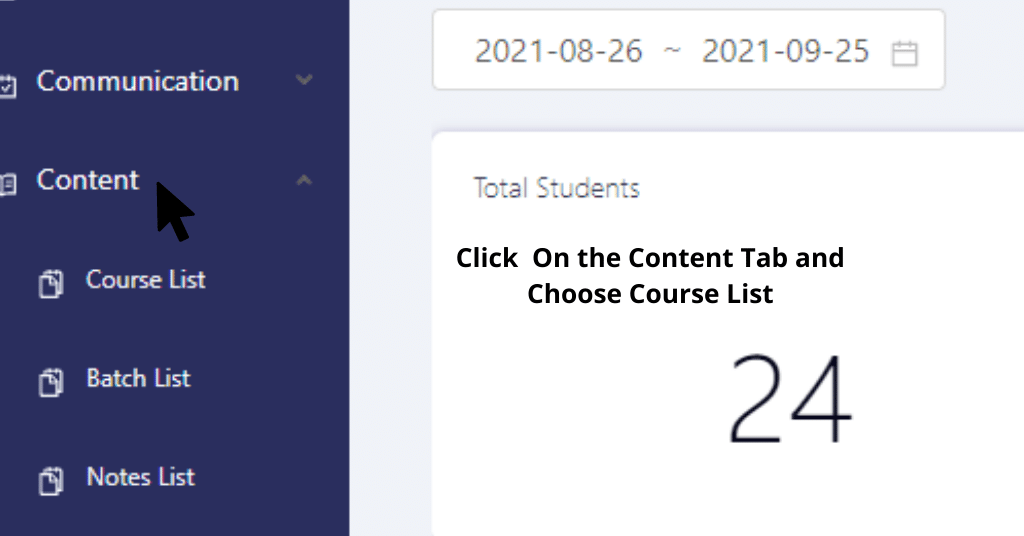
Step 4- Once you are successfully logged in, towards the left column of the page, click on the content and choose the course tab.
Step 5- Now click on create the course and let your creative journey kickstart.
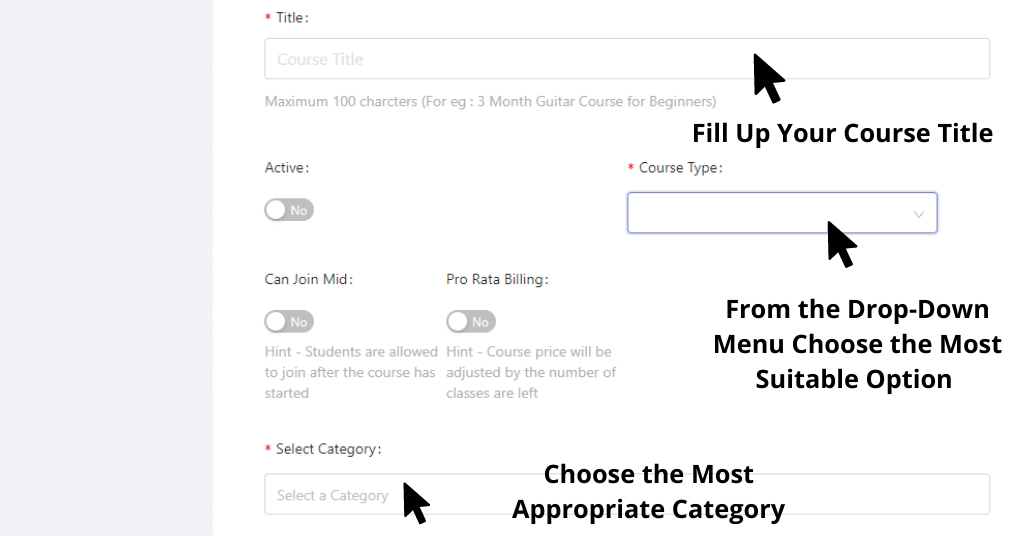
Step 6- In the title section, add the activity that you will be teaching to the students.
Step 7- Once you have filled the course title tab, move towards the course type, and from the drop-down option click on the most appropriate option.
(In case you want to create a workshop then click on events and in case you want to create a course then click on the classes).
Note– Towards the left side of the course type you will see the active button. Make sure that the active button is always on.
Step 8- Head towards the category tab and select the most appropriate category that will go well with the course that you want to teach.
(You can choose more than one category)
Step 9- In the short description section, you need to describe your course or workshop in around 100 words.
Step 10- In the overview section, write about the overall aim of your course or the workshop and how the students will benefit.

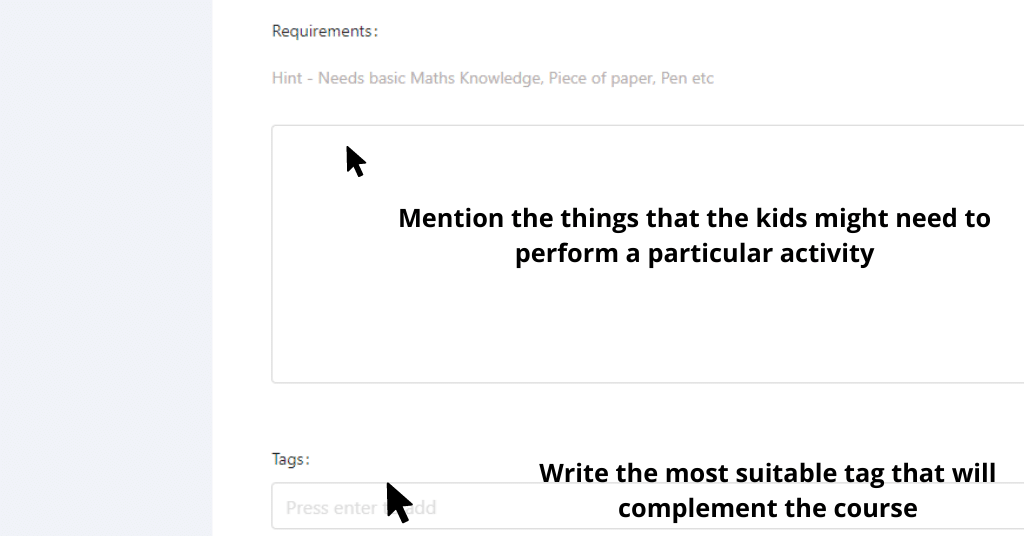
Step 11- In the requirements section, you simply need to mention the things that the kids might need to perform a particular activity. In case nothing is needed, please mention that.
Step 12- After filling up all the necessary details, in the tag section, you need to choose and write the most suitable tag that will complement the course that you have chosen.
Step 13- After filling up all the details double-check before clicking on the confirm button.
Step 14- After you have successfully clicked on the confirmation button, your course/workshop will be created and you can recheck on the first page.
Using these 14 simple steps, you will be able to create your own course/workshop on our website. To create your content on our website, make sure that your tutor profile is up to date and approved.
Related Articles: This Is Why You Must Enroll Your Kids For Online Classes [5 Reasons]
As a part of our creation process, the next step is to create and activate the batch on our website. Well, the process of batch creation is also important for the tutor. You have to simply follow the steps for the effortless creation of your batch.
Steps to Follow While Creating Batch on PiggyRide
Step 1- Towards the left-hand side of the webpage, click on the content tab.
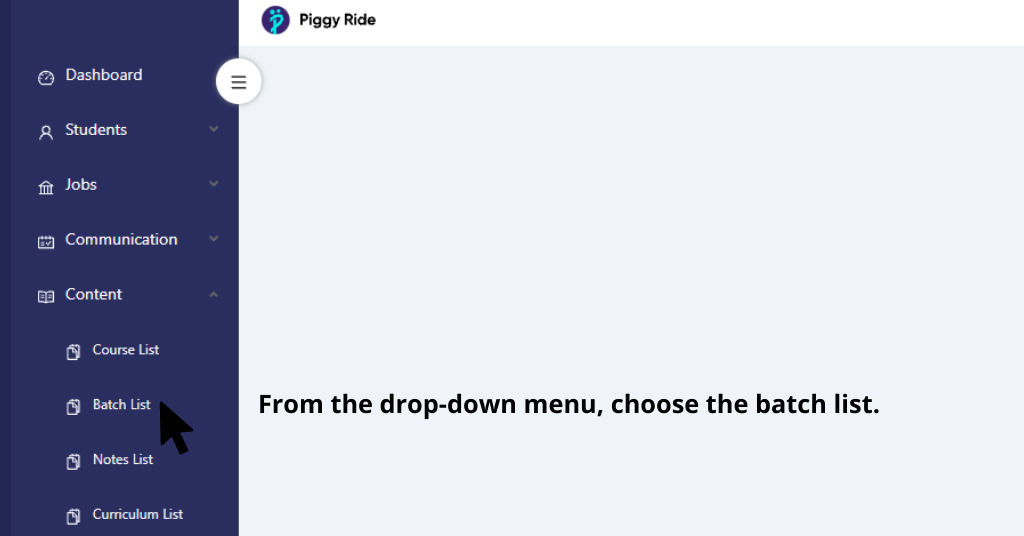
Step 2- From the drop-down menu, choose the batch list.
Step 3- Click on the create batch option, as this will enable you to create a batch on our website.
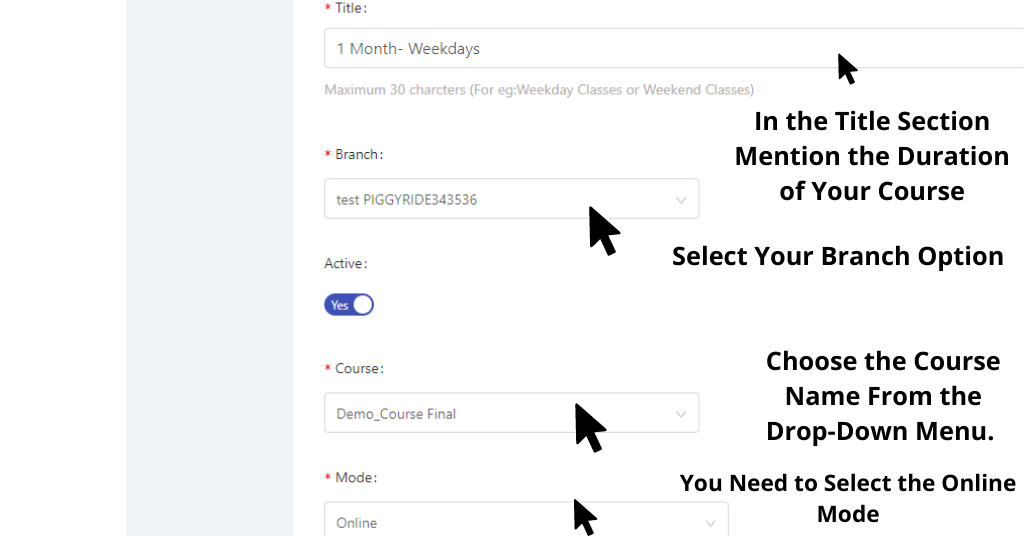
Step 4- In the title section, you need to mention the duration of your course in the order mentioned below for your reference:
1 Month- Weekdays
Step 5- Now move to the branch section, and select your branch option.
Note- Make sure that the active button is always on.
Step 6- After selecting the branch, move towards the course tab and choose the course name which you create from the drop-down menu.
Step 7- In the Mode Field, you need to select the online mode.
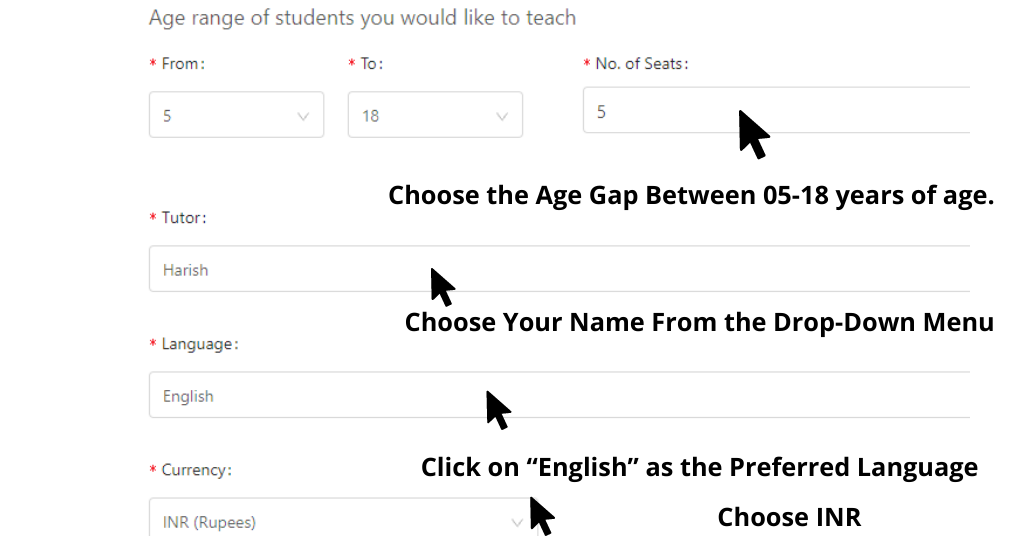
Step 8- As you will move down, in the age range tab you should choose the age group between 5-18 years of age.
Step 9- Towards the right-hand side of the age tab, you will see the total number of seats. In case it’s a group workshop or a course you need to enter 5 in the textbox provided. And in case it is a one-on-one class, you should mention 1 in the textbox.
Step 10- In the tutor tab, you need to select your name from the drop-down menu.
Step 11- In the Language tab, click on “English” as the preferred language. Always ensure that the language tab will always be “English”.
Step 12- The currency that you will choose should always be (INR).
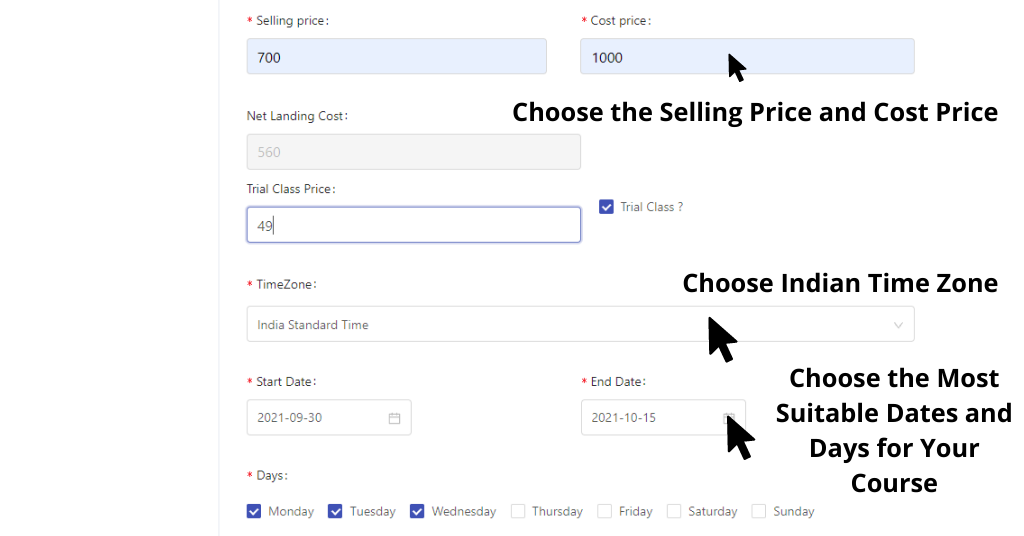
Step 13- After carefully selecting the currency, come down to the selling price and cost price tab. In the cost price tab, you need to enter the base price that is the original price of your course/workshop. Similarly, in the selling price tab, you need to enter the discounted price that you will offer to the students.
Note- The selling price for a free workshop will always be 0.
Step 14- Click on the trial class option and write down INR 49 in the trial class price.
Note- The option for the trial class price is applicable for the course and not the workshop.
Step 15- Come down to the time zone section, and choose Indian Standard Time from the drop-down menu.
Step 16- Below the time zone tab, in the “start date” and “end date” tabs, choose the most appropriate dates for your course and when it will end.
Step 17- Now select the total number of days that should be appropriate as per your course timeline.
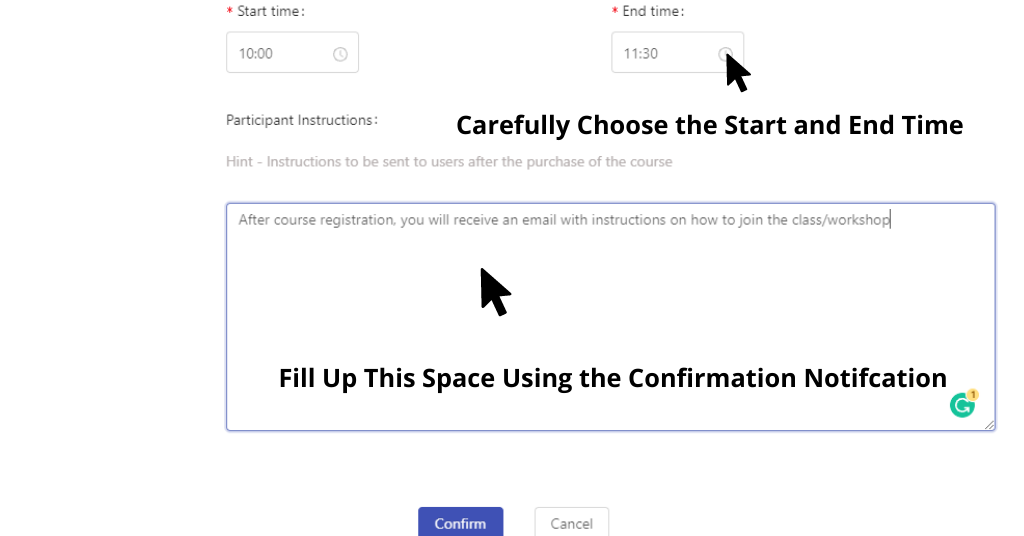
Step 18- Once the days are also selected, come down to the time. Click on the “start-time” and “end-time”. This step has to be in accordance with your course duration.
Step 19- In the participant instructions tab, you simply need to write this- “After course registration, you will receive an email with instructions on how to join the class/workshop”.
Step 20- After filling up all the details double-check before clicking on the confirm button. Being a diligent tutor, it is your responsibility to ensure that all the steps are performed in proper order.
Step 21- After you have successfully clicked on the confirmation button, the batch will be created for your chosen course/workshop.
Related Article: 7 Important Tips For Teachers Taking Online Classes
Using these 21 steps, you can easily create the batch on our website hassle-free. As a tutor, if you are looking forward to starting your teaching journey, join our platform today.
Voila, you are all set to start your creative teaching journey with PiggyRide!

WRITTEN BY:
Ridhi Dogra
Hi Friends! I am Ridhi Dogra.
I am working as a Content Writer with PiggyRide. I graduated from Delhi University with a bachelor's degree in Home Science and I did my post-graduation in Journalism and Mass Communication from Amity University. I am an avid reader, a passionate traveler, and a movie buff.
Leave a Reply